For many years, I was content to press a diagonal fold on the starting end of my binding, and tuck the other end inside when I was finishing the stitching. I saw new tools being demo'd that marked the ends to make a perfect join, then read about a method that uses NO SPECIAL TOOLS, and have been using this method ever since!
1. Prepare your binding as usual, making sure to cut the starting edge straight and square.
2. Begin stitching your binding at least 4 inches from the cut end, stitching with a 1/4 inch seam and making the corner miters as usual. Continue around the perimeter of the quilt, stopping well before you reach the beginning.
3. Stop stitching at least 5 inches before the raw unstitched end of the binding. I usually back stitch to lock the final stitches.
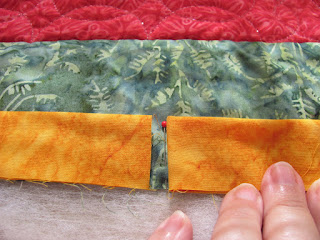
4. Smooth the beginning unstitched end in place, now called the left side, then measure 1/4 inch from the cut end and mark with a pin.
5. Carefully, place the right side end into place, then fold back on itself at the pin marking.
6. Measure from the fold and mark - use the width of your binding for this measurement. I make mine with 2 1/2 inch strips, so that was my measurement. If you use 2 1/4 inch strips, you would measure 2 1/4 inches from the fold. Cut the right hand binding end on this mark.
7. As you can see, the right hand end of the binding overlaps the left hand end.
8. Take the right hand end of the binding and fold up and away from the raw edge of the quilt.
9. Open the right hand binding, with the right side of the fabric showing.
10. Open the left hand binding, with the wrong side of the fabric showing.
11. Place the left end of the binding over the right end, preparing to stitch a diagonal seam. I always pin the corner first, then place the pins on the stitching line. You can mark a pencil line before pinning if you like.
12. Gently open the binding to check that everything is in the correct orientation.
13. Stitch the diagonal seam, making sure that you are stitching 12-15 stitches per inch.
14. Trim seam allowance to about 1/4 inch and finger press open.
15. Re-fold your binding and stitch in place.
16. I always measure my completed binding from the stitching to the folded edge so I know where to trim my batting and backing. I like my binding to feel "full" when I have finished stitching.
17. Since my binding measured 1 inch from stitching to folk, I use half that measurement, 1/2 inch, to trim the batting and backing before hand stitching the fold to the back of the quilt. If you like to stitch your binding on my machine, using the "stitch in the ditch" method, then I would trim the batting and backing to match the raw edge of the quilt, to allow the extra fabric to cover the stitches on the back. I prefer finishing mine by hand, and I also stitch the corner miters closed at the same time. I hope you'll give this great method a try on your next project.


That's a great turorial - I've tried this method before and couldn't get it to work, but with your photos and explanation, it finally clicked! Thanks so much!
ReplyDeleteum, "tutorial" :)
ReplyDelete