Kaleidoscope Tutorial Part 3
I don't use too many pins while sewing, but this is a good place to use some. When I pick up the first pair of block quarters, I pin the top together, then I match the bottom, using the "dog ears" (overhanging seam allowances) to help match the focal fabric seams. After stitching the block quarters into block halves, I trim the "dog ears" on the focal fabric, press the seam flat, with a hot, dry iron, then press the seam allowance open.
Remember to keep those matching pairs together!
The next step is the final one, and the most crucial. You need to match the spot where all 8 focal triangles come together.
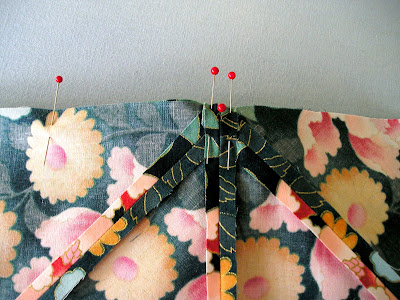
From the wrong side, stick a pin through the spot where 4 seams intersect. Now stick the pin into the same intersection from the right side of the other half.
If you enlarge the picture, you can see where the pin comes from one layer and into the next at the intersection (my pin has a red head). Now line up the edges, but keep the pin straight up and down, keeping the intersection perfectly together. Take another pin, and pin through the seam allowances, first on one side of the pin doing the matching, then on the other side. I keep these pins fairly close together. If you pin the pieces together with the initial pin, the motion of angling the pin to bring it through to the other side is enough to allow the layers to slip just a tiny bit, and this will show when you have stitched the seam.


No comments:
Post a Comment
Thank you. Your comments are important to me.