Showing posts with label plaid. Show all posts

Sunday, January 15, 2012

STASH REPORT SUNDAY

Fabric used this week  15.75 yards
Fabric used year to date  27.625 yards
Fabric added this week  0 yards
Fabric added year to date  13.75 yards
Net used 2012  13.875 yards!
 I'm finally in the black and intend to stay there!  I managed to finish all three of my table runners, made with the Autumn Leaves pattern by Quilt in a Day. 


I also pin-basted two more baby quilt panels, and used the quilting as my warm-up before quilting the runners.


 I'm still trying to use up the last bits of plaid fabric, so I made a small Cathedral Window wall hanging, using the machine method in Shelley Swanland's book.  I saw this being demo'd on Simply Quilts many years ago, and made a project then, but I always wanted to re-visit this interesting method.  It took a while to wrap my head around the correct way to add the units, but I finally found the "rhythm", and the project was finished quite quickly.  
Back after piecing
 I used leftover black from my purse, leftover muslin, and squares of plaid, along with a few strips for the quilt back and binding. 
squares in place, ready for quilting
 The quilting is done while you are stitching down the arcs, and then there is just the binding to complete the quilt. 

I plan on making a larger one in batiks that I bought on sale early in January.
Check out everyone's progress at Judy's blog.....

Monday, December 19, 2011

DESIGN WALL MONDAY

I completed my Christmas hexagon - minus the final borders.  I took a picture of it on my queen bed.  I'll get the borders on after the plaid quilts are completed!
 I used the John Flynn method of diagonally pieced backs for two of my plaid quilts.  I pieced together all the left-over parts from the three plaid quilts, then cut them into lengths that were the same as the width of the tan muslin I was using.  After stitching them together, I folded them on the diagonal, corner to corner, cut apart, then slid the pieces to the correct width measurement, pinned and stitched them together.  This method works well for quilts that are up to 1 1/2 times the width of the fabric.  For one of my quilts, I used a pieced strip on one side to meet the requirement, and on the other I used a pieced strip on both sides.  The first time you try this method, you will be sure that it won't work,  but I have used it successfully many times!
I have difficulty taking a picture of the backing, as my living room is small and I had no room to spread it out!  You can see the strip of squares in the top right corner of the picture.  These were added to make the pieced part fit the 1 1/2 times criteria.   Now head over to Judy's blog to see what others are working on this week!


Monday, December 12, 2011

DESIGN WALL MONDAY

Our company headed north this morning, and DH left for the golf course at 7:30, so I headed right to my sewing room.
I managed to get the borders sorted out and attached to plaid quilt number 3.  I had to get creative, because none of my left-over yardage was long enough for the final border.  The pattern for the centre was "Smokey Mountain Stars" from Quiltville.  

I "double stitched" the corner squares and had lots of half-square triangle units left, so I sewed most of them into pinwheel blocks, then used some of the leftover strips from plaid quilt #2 to make them the right size to fill the gap in the final border.  

Since the two borders had corner squares, I used leftover strips from plaid quilt #1 to make strippy corner squares.

Now I have to get busy and make up the backs for each of these quilts.  Then I'll plan a pin-basting binge with DH - he is an awesome help!  I am determined to have NO LEFTOVER PLAID to take home in the spring!

Tuesday, November 29, 2011

SPINNIN' SPOOLS TOP COMPLETE

I finished the top late yesterday, and made the binding this morning.  DH held to top so I could take a quick picture.

This morning I mixed up the dough for a loaf of pumpernickel bread, headed out to do a bit of grocery shopping, along with some toys for the Toys for Tots annual drive.  When I returned home, I made a pan of cheesecake brownies, then baked the bread - company coming on Thursday!
I'm heading out to my sewing room to cut the pieces for the remaining plaid quilt.  Hopefully, this will finally use up most of the plaids.  Anything remaining will decorate the quilt backs....

Sunday, November 27, 2011

STASH REPORT SUNDAY

Used this week  0 yards
Used year to date  215.5 yards
Added this week  0 yards
Added year to date  70.25 yards
Net used 2011  145.25 yards
 Just because I reported 0 yards used, doesn't mean that I'm not quilting!  I only report finished quilts, so I'd better get busy and finish the tops so I can begin the quilting!
I've been working on my "Spinnin' Spools" quilt, using another scrap block pattern from Bonnie Hunter in Quiltmaker magazine.

The first picture is the blocks pinned in sets of 4, ready for sewing.
Then they are sewn together assembly line style, first in one direction, then in the other.


 After a good pressing, the blocks were arranged on the living-room carpet.  DH helped me re-arrange the blocks until there were none with the same plaid spools next to one another.
These will  have sashing and cornerstones added when stitching.
 

I picked up the blocks, stacking each row from the top to the bottom, then pinned each row of blocks together in the top right-hand corner.  Row one (marking from right to left) has 1 pin, row two has 2, row three, 3.  The next couple are marked in Roman numerals ( fewer pins) - four is marked IV and five is V.  This way if I drop the blocks on the way to the sewing machine, or move them, I'll still know which way they go into the quilt!


Here are all the sashing strips and cornerstones, waiting for today's sewing.

Head over to Judy's blog to see everyone's stash progress.

Monday, November 21, 2011

DESIGN WALL MONDAY

I'm off and running on plaid quilt number two - another Bonnie Hunter pattern from Quiltmaker magazine.  This one is called "Spinnin' Spools", and uses 2 inch strips and squares.  I decided to use all the same fabric for the "light" portion of each spool.  The top right hand set of 4 is a finished block, measuring 9 inches finished.  I plan to put sashing between each block, as I want a bit larger quilt this time.  I'm aiming at about 60x80 inches.  I'll probably make all the spool units before deciding how to pair them up, so I don't get too many colour combinations the same.  DH has a great eye for this, so I'll probably have the parts all over my living room carpet!  I'll be making 35 blocks this time, so that means 140 spool units.


Let's see what other creative bloggers have on their design wall by visiting Judy's blog.

Saturday, November 19, 2011

ONE TOP DOWN - TWO MORE TO GO

Here is the completed "Moth in the Window" quilt top.  I have green plaid binding prepared, and now I'm getting ready to start plaid quilt #2.

This time I'm using another of Bonnie Hunter's scrap blocks from Quiltmaker magazine.  
I'll be making "Spoolin' Around", found in the July/August issue No. 140.

Once again, I drew the block in Electric Quilt, and decided to use sashing and cornerstones between the blocks this time.  I'll also be using a single fabric for the "light" component in the block.

Friday, November 18, 2011

FINAL PLAID BLOCKS (for this quilt.....)

I finished the final set of 6 blocks.

Then I had to lay them all out on the living-room carpet.  Since 18 blocks had dark "moths" and 12 had light "moths" I laid them out in alternate rows of 6.  After peering at it for quite a while, DH noticed that there were a couple blocks that had the same fabric, residing next to each other, so after a couple of changes, the block layout was decided.

Thursday, November 17, 2011

FOURTH SET OF PLAID BLOCKS

I'm coming down the home straight - finished the fourth set of 6 blocks.  Since I am reorganizing the pairs, I decided to change the location of the lights and darks for the next two sets of blocks.
 I managed to finish these before heading out to my quilt group, and even had time for a small lunch!
There was only a small group in attendance, so we all worked on some items we brought to finish, and talked about plans for projects this season.  Many of the part-time and full-time residents head north for either thanksgiving or Christmas or both, so the group really swells in size when January arrives.  This is the time some members like, as they get extra help with some of their quilting problems.
Now I have to add some planning for upcoming quilt group projects to my "To Do List".

Wednesday, November 16, 2011

THIRD SET OF BLOCKS!

So far so good - I made another 6 plaid "Moth in the Window" blocks again yesterday.  I'm trying to keep up the pace, but today is the first day my quilting group meets, so I might not finish all 6......

I have 18 finished blocks and only 12 more to go!  I think it takes more time to choose the pairs of fabrics for each block than it does to sew them together!  This was the end of my plaids, so now I have to rearrange the pairs of fabrics for the next blocks, trying not to make the same choices again.
I plan to make two more projects from my plaid fabrics, so I'll probably move on to the next project when the top is complete on this one.   I've been cutting the borders first, to make sure I have enough fabric.  Some of my plaids are only half yards or fat quarters.  Some are yards, and just a few are larger.  Don't want to run out before I get the tops made.  Then I plan to use the rest for backings......

Tuesday, November 15, 2011

MORE PLAID!

I'm trying to make 6 "moth in the window" blocks each day.  My sewing room gets very hot by the afternoon hours, so I'm heading out first thing in the morning, trying to keep to my self-imposed schedule.
Here are the 2nd 6 plaid blocks....
I think I have enough fabrics left to make another 6 blocks, then I'll have to re-arrange the pairs of fabrics for the rest of them.  
I managed to get the second large corner attached to my Christmas hexagon project - pictures to come soon.

Monday, November 14, 2011

DESIGN WALL MONDAY

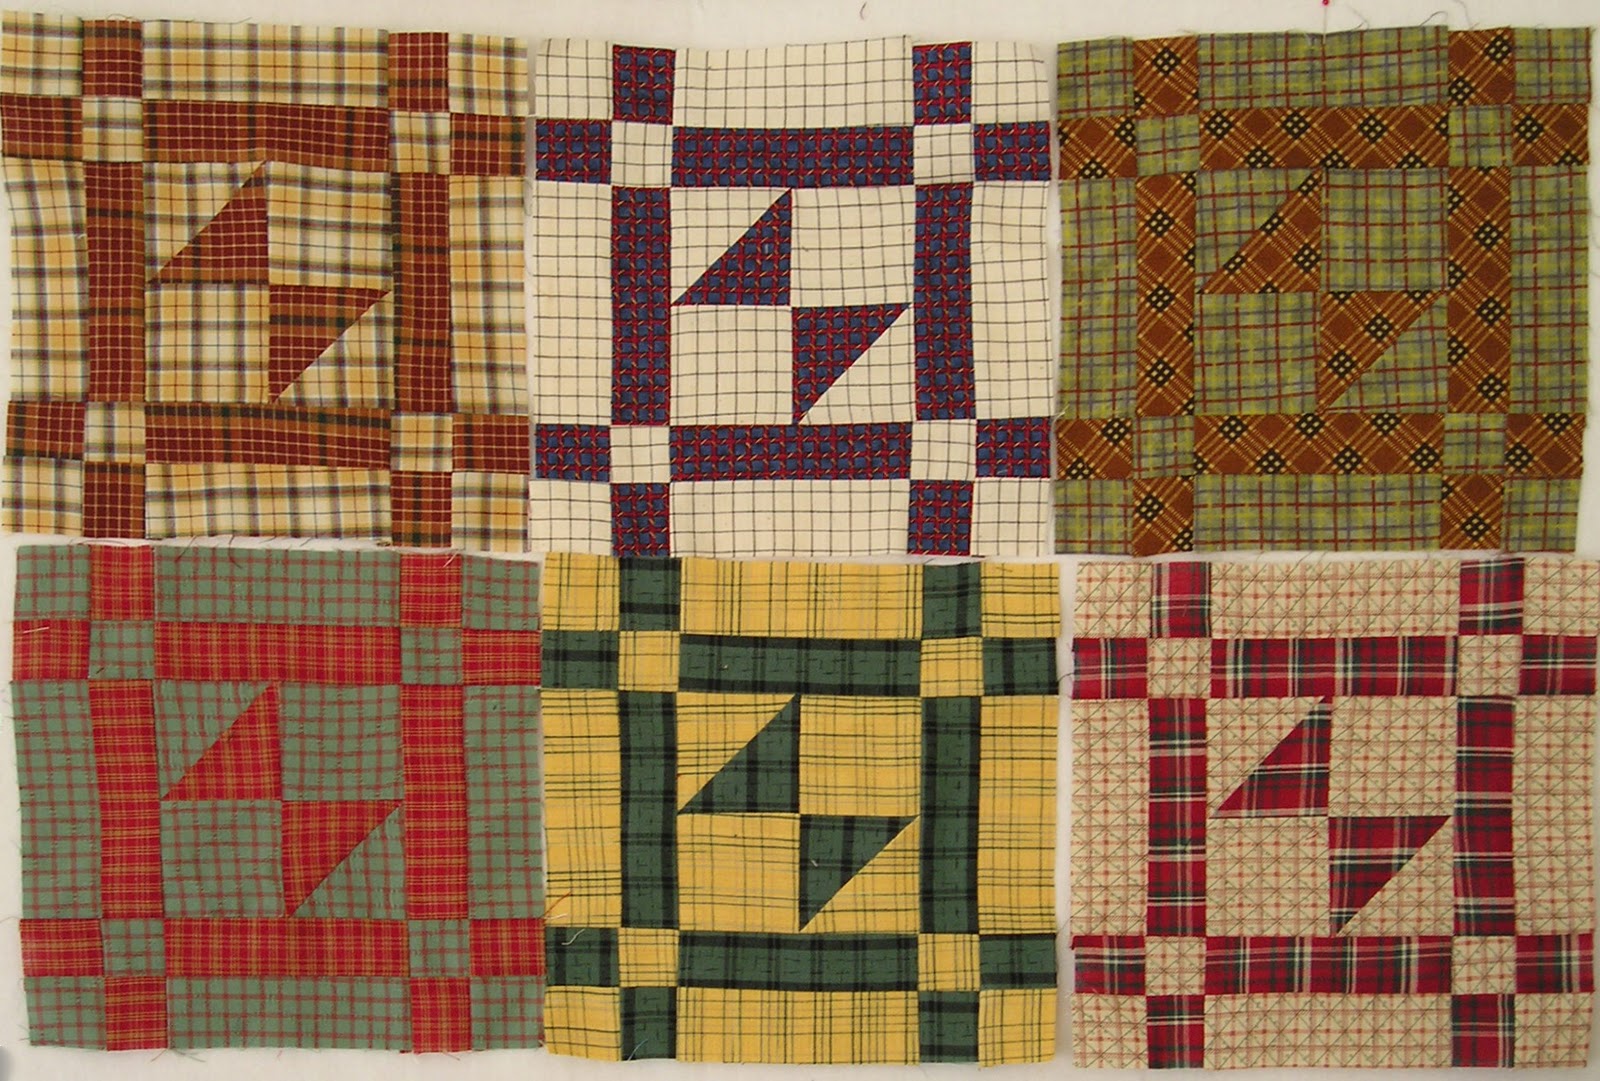
Finally, something on my tiny Florida design wall.  I was inspired by Bonnie Hunter's scrap block design, "Moth in the Window", found in Quiltmaker magazine.  I brought my entire stash of plaid fabrics with me, and managed to finish 6 blocks (only 24 more to go!)
 I've also been stitching on my hexagon quilt.  I have the second large corner almost finished, and hope to add it to the large piece tonight!  It always surprises me, how long it takes to add the large corner.  It may take 2 TV nights to get it added!


Check out Judy's blog, to see what is on everyone' design wall today.

Sunday, March 21, 2010

Finally a picture of the whole quilt!

Decided to name this one
"Oh, My Plaid Stars!"
Asked a friend to come over to be a quilt holder yesterday.  He and my DH stood on ladders while I photographed the quilts that I have completed this winter.
I always find it difficult to take pictures of quilts that show all the details, especially in the quilting.  At least I have a record of all the quilting in the different areas.
The background fabric is more of a tea-dyed colour of muslin, and the star colours are much brighter as well.  I must learn more about Photoshop!

Tuesday, March 16, 2010

Last Section Quilted!

Finally finished the last round of feathers!  These travel between the gold and rust stars, and the blue plaid "chain" area.
Once again, I planned the route that the stem travels by tracing a pencil line on the gray-scale print out of the quilt design.
Machine quilted using my Juki with no frame.
Just the feather quilting took 14 filled bobbins of tan thread!  Now I have to spend some time checking the front and back for stray threads.  I try to do this while I am stitching, but there are always just as many "hidden" on the quilt - especially a busy quilt with a pieced plaid backing!
Now I just have to wait for a wind-free day to get a picture of the whole quilt!  This is a big one - blocks are 12 inches finished, and they are in a 7 x 9 layout.  DH wondered why I wasn't adding a border!

Sunday, March 14, 2010

Plaid Star Quilt Centre Close-up

Another view of the centre "circle" of the plaid star quilt.  This shows a close-up of the "Hooked on Feathers" filling a slightly awkward area.  Once a decision is made about the spine shape, the rest is quite easy.  I actually used a gray-scale picture of the full quilt, and drew the spine line in each area as a guide to my stitching.
As always, machine quilted with my Juki and not using a frame.

Saturday, March 13, 2010

Plaid stars Heading to the Finish

I finally figured out a path for the centre area of the quilt.  The "Hooked on Feathers pattern seems to fit into almost any space with just a bit of pre-planning.
This was machine quilted on my Juki, without the use of a frame.
The end is in sight!

Tuesday, March 9, 2010

The first corner is completed!  Now to work on the other 3!
Then I have to figure out how to quilt the centre area!
Still doing "Hooked on Feathers", using my Juki to machine quilt.
 

Sunday, March 7, 2010

Circles of Feathers

There are quite a few small yellow plaid stars in this quilt, so I decided to quilt a circle of feathers around each one.
I found a plastic bowl lid that was just the right size to mark the circle, using a hera marker (sharp edged plastic that makes a visible creased line).  Once the stem was stitched, I was able to make "Hooked on Feathers" hooks and flourishes on both sides of the stem.  Hand guided machine quilting with a Juki machine and no frame.

Friday, March 5, 2010

Stitching around a larger Plaid Star

 
More feathers with a few more flourishes.  It is like a puzzle, trying to fill all the spaces!
It is very satisfying to see a plan develop, and I still love doing the "Hooked on Feathers" method.
This was hand guided without using a frame, stitching with my Juki.

Thursday, March 4, 2010

More Plaid with Feathers

 
More "Hooked on Feathers" filling the area around a small star.  This was part of a continuous loop in a corner section of the quilt.  I love the way the feathers grow and shrink to fill the spaces.