I don't use too many pins while sewing, but this is a good place to use some. When I pick up the first pair of block quarters, I pin the top together, then I match the bottom, using the "dog ears" (overhanging seam allowances) to help match the focal fabric seams. After stitching the block quarters into block halves, I trim the "dog ears" on the focal fabric, press the seam flat, with a hot, dry iron, then press the seam allowance open.
Remember to keep those matching pairs together!
The next step is the final one, and the most crucial. You need to match the spot where all 8 focal triangles come together.
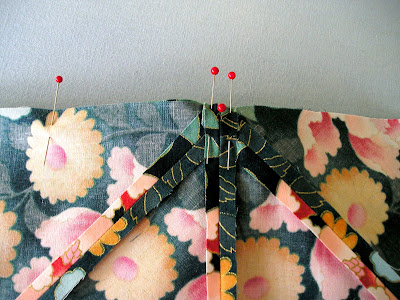
From the wrong side, stick a pin through the spot where 4 seams intersect. Now stick the pin into the same intersection from the right side of the other half.
If you enlarge the picture, you can see where the pin comes from one layer and into the next at the intersection (my pin has a red head). Now line up the edges, but keep the pin straight up and down, keeping the intersection perfectly together. Take another pin, and pin through the seam allowances, first on one side of the pin doing the matching, then on the other side. I keep these pins fairly close together. If you pin the pieces together with the initial pin, the motion of angling the pin to bring it through to the other side is enough to allow the layers to slip just a tiny bit, and this will show when you have stitched the seam.
Here are the pieces from the first part, lined up at the sewing machine, ready to sew. Take the pieced triangle on the right, and place it, right sides together, onto the piece on the left.
The point of the background triangle lines up with the corner of the rectangle. Begin to stitch the seam, using a scant 1/4" seam allowance. Stop and line up the rest of the block. If it doesn't fit exactly, remember that one edge of the focal fabric is bias and will stretch or ease a tiny bit. Both seam allowances are facing towards you, so they stay in place while stitching. (If you have a straight stitch plate for your machine, this would be a good time to use it. Points tend to be pulled into the zig-zag slot, especially on machines with a wider stitch area.)
Now is the time to carefully trim the overhanging triangle of background fabric, using scissors or your rotary cutter and ruler. Press the seam flat, with a hot, dry iron, then press the seam open.
At this time, you should trim all the "dog ears" (overhanging seam allowances) except for the two on the focal fabric.
Repeat with the other 3 parts of the block, then lay them out in the correct orientation, with all the focal fabric pointing to the centre of the block.
Now flip the pieces on the right side onto the pieces on the left side (right sides together). Place them beside your sewing machine, and repeat with the remaining blocks. Take care not to mix up the pieces - seems obvious, but........
Following the instructions in the book, "Magic Stack-n-Whack Quilts", carefully layer 8 repeats of your chosen fabric. When lining up the layers, pin straight through, matching the pattern, then while holding the pin, use a second pin to carefully pin the layers without allowing them to slip or slide. Take your time with this step. Cut strips, then squares, then cut the squares in half to form 2 triangle "block kits" from each square. A new blade is essential for this step, and use twice as many pins as you usually would. Look for pins before cutting; move any pins that are in the way! Cut 4 squares and 4 strips of background fabric for each block kit. I line mine up at the sewing machine like this:
Sew four triangles from your block kit, (focal fabric), by flipping the background triangle onto the focal fabric, sewing with the background fabric on top. Take care to keep the edges lined up and use a scant 1/4" seam.
Continue with the four rectangles.
The strip is much longer than your focal triangle, but just continue to sew to the end of the strip, then stitch the next one, assembly line fashion.
Repeat with each block kit. Cut the sewn pairs apart, making sure to keep all 8 pieces together. Lay the pieced triangles on your ironing surface, with the focal fabric on top, and press flat, to "set the seam".
Then gently press the seam toward the focal fabric, using a hot dry iron.
Next, repeat this step with the strip unit, first setting the seam with the focal fabric on top,
then gently, pressing open, with the seam allowance pressed to the focal fabric. The pressing instructions are very important while using this method, as pressing in the correct directions makes piecing the units much easier.
Now make a stack that looks like this in preparation for the next step. Make sure to keep the pieces for each block together - you don't want any surprises, and bias edges don't like to be unstitched.
I've received quite a few comments on the various kaleidoscope blocks and projects that I have shown, so I thought I might try to write a tutorial.
The first thing I recommend is to purchase Bethany Reynolds' book, "Magic Stack-n-Whack Quilts", and read it carefully. These projects are fun, but they do require a quilter who is willing to spend the time in careful preparation, sewing and pressing.
1. Bethany does not suggest pre-washing your fabric, but all my fabric goes into the wash before it resides in my sewing room. To make up for the sizing that is washed away, I use spray starch on the yardage, being very careful to keep the grain straight in both directions. I usually starch the background fabric as well. You could also use spray sizing or the "best pressed" product. Adding one of these makes working with all the bias edges much easier.
2. Put a new blade in your rotary cutter! Bethany suggests using a 60mm size cutter, but I have cut 8 layers with my favourite 45mm cutter and a brand new blade.
3. Pressing is done with a hot dry iron - no steam! You want to press just enough to flatten the seam, but not to distort the shape. Remember bias can curve and stretch, so be extra careful.
4. I don't pin very often, when piecing quilt blocks, but these blocks do require careful pinning in several areas.
My favourite patterns from the book are 60 degree Triangle Magic, and Half Square Triangle Magic, which is the one I will demonstrate.
I don't intend to provide a pattern, yardage or measurements for this project. You will find those in the book. You can find a link to Bethany's site here, and to a chart showing how to cut smaller kaleidoscope pinwheel blocks here.


